
USB Relay Modules are invaluable tools for automating and controlling electrical devices through a computer interface. By leveraging Free and Open Source Software (FOSS) such as Python and the pyserial library, users can integrate these modules into projects ranging from home automation to industrial control. In this guide, we’ll show you how to control a 2-channel USB Relay Module, explain relay wiring, and provide use cases for broader applications. Additionally, we’ll include a table for controlling up to 8 channels and explain the logic behind their addressing.
FOSS-based solutions not only reduce costs but also foster adaptability and transparency. Whether you are an enthusiast, researcher, or engineer, this approach empowers you to build reliable and customizable automation systems.
Table of Contents
Step 1: Prerequisites
USB Relay Module: Ensure you have a USB relay module that supports serial communication (commonly recognized as a USB-to-serial device).
Python Installed: Verify Python 3 is installed on your Linux/macOS system.
python3 --version pyserial Library: Install the pyserial library to communicate with the USB relay. Use:
pip3 install pyserialStep 2: Identify the USB Relay Module
Connect the USB relay module to your computer. Then, identify the device path:
On Linux:
ls /dev/ttyUSB*On macOS:
ls /dev/cu.*Look for a device like /dev/ttyUSB0 (Linux) or /dev/cu.usbserial-xxxx (macOS).
Use Cases for USB Relay Modules
| Use Case | Description |
|---|---|
| Home Automation | Control appliances such as lights, fans, or coffee machines programmatically for a smart home setup. |
| Laboratory Testing | Automate test equipment for power cycling or repetitive tasks in research labs. |
| Industrial Automation | Manage manufacturing tasks like conveyor belts or robotic systems by toggling power. |
| Prototyping and Development | Simplify circuit testing or device prototyping by toggling specific components. |
| Energy Management | Schedule power delivery to devices based on timers or external sensor data to save energy. |
| IoT Integration | Connect relay modules to IoT platforms for remote monitoring and control. |
Relay Wiring: NC, NO, and COM Terminals
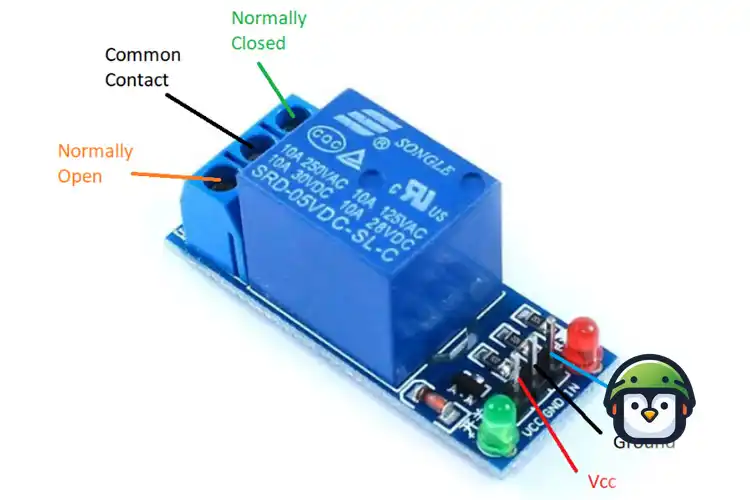
Each relay channel has three terminals:
- COM (Common): Connects to the input power or signal.
- NC (Normally Closed): Maintains a closed circuit when the relay is OFF.
- NO (Normally Open): Maintains an open circuit when the relay is OFF.
Wiring Example
- Normally Closed (NC): Use for devices that need to remain ON by default and turn OFF when the relay is activated.
- Normally Open (NO): Use for devices that need to remain OFF by default and turn ON when the relay is activated.
This dual functionality makes USB Relay Modules versatile for both safety-critical and trigger-based systems.
Serial Commands and Logic for Addressing
USB Relay Modules communicate using serial commands, with each command consisting of:
- Header: Marks the start (
0xA0). - Channel: Specifies the relay channel (
0x01for relay 1,0x02for relay 2, etc.). - State: Determines whether to turn ON (
0x01) or OFF (0x00). - Checksum: Ensures data integrity. Calculated as
Header + Channel + State.
| Channel | Turn ON Command | Turn OFF Command | Logic |
|---|---|---|---|
| 1 | 0xA0 0x01 0x01 0xA2 | 0xA0 0x01 0x00 0xA1 | Checksum = 0xA0 + 0x01 + State |
| 2 | 0xA0 0x02 0x01 0xA3 | 0xA0 0x02 0x00 0xA2 | Checksum = 0xA0 + 0x02 + State |
| 3 | 0xA0 0x03 0x01 0xA4 | 0xA0 0x03 0x00 0xA3 | Checksum = 0xA0 + 0x03 + State |
| 4 | 0xA0 0x04 0x01 0xA5 | 0xA0 0x04 0x00 0xA4 | Checksum = 0xA0 + 0x04 + State |
| 5 | 0xA0 0x05 0x01 0xA6 | 0xA0 0x05 0x00 0xA5 | Checksum = 0xA0 + 0x05 + State |
| 6 | 0xA0 0x06 0x01 0xA7 | 0xA0 0x06 0x00 0xA6 | Checksum = 0xA0 + 0x06 + State |
| 7 | 0xA0 0x07 0x01 0xA8 | 0xA0 0x07 0x00 0xA7 | Checksum = 0xA0 + 0x07 + State |
| 8 | 0xA0 0x08 0x01 0xA9 | 0xA0 0x08 0x00 0xA8 | Checksum = 0xA0 + 0x08 + State |
Simplified Python Script for a 2-Channel Relay
Below is an easy-to-follow Python script to control a 2-channel USB relay:
pip3 install pyserialimport serial
import time
# Set up the serial connection
serial_port = "/dev/ttyUSB0" # Replace with your device path
baud_rate = 9600 # Check your relay's documentation
timeout = 1
# Initialize serial connection
ser = serial.Serial(serial_port, baud_rate, timeout=timeout)
def send_command(command):
"""Send a command to the USB relay."""
ser.write(command)
time.sleep(0.1) # Small delay to ensure the command is sent
try:
# Turn Relay 1 ON
send_command(bytes([0xA0, 0x01, 0x01, 0xA2]))
print("Relay 1 ON")
# Turn Relay 2 ON
send_command(bytes([0xA0, 0x02, 0x01, 0xA3]))
print("Relay 2 ON")
time.sleep(2)
# Turn Relay 1 OFF
send_command(bytes([0xA0, 0x01, 0x00, 0xA1]))
print("Relay 1 OFF")
# Turn Relay 2 OFF
send_command(bytes([0xA0, 0x02, 0x00, 0xA2]))
print("Relay 2 OFF")
finally:
# Close the serial connection
ser.close()
Troubleshooting
On Macs, when suddenly your USB relay module fails to work, here are a few steps to follow:
Run lsusb.
lsusbIf you get this error or something similar, your usb drivers are corrupted in someway. Don’t panic!
2024-12-06 18:16:32.372 system_profiler[839:6837] SPUSBDevice: IOCreatePlugInInterfaceForService failed 0xe00002be
Bus 020 Device 000: ID 05ac:8600 Apple Inc. Apple T1 Controller
Bus 000 Device 001: ID 1d6b:ISPT Linux Foundation USB 3.0 Bus
/usr/local/bin/lsusb: line 89: 16#00
01: syntax error in expression (error token is "01")
Bus 000 Device 001: ID 1d6b:CIAR
CIAR Linux Foundation USB 3.1 Bus
The output suggests a mix of diagnostic information and errors related to USB devices and system commands. Here’s a breakdown:
- SPUSBDevice Error:
SPUSBDevice: IOCreatePlugInInterfaceForService failed 0xe00002be: This is a macOS system_profiler error, indicating a failure to create a plugin interface for a USB device. It usually points to a driver issue or a misconfigured/unsupported USB device.
- Bus Information:
- Details like
Bus 020 Device 000: ID 05ac:8600 Apple Inc. Apple T1 Controllerindicate recognized USB devices, where05ac:8600is the vendor and product ID pair for the Apple T1 controller. - The Linux Foundation entries suggest USB hubs or controllers.
- Details like
lsusbCommand Error:/usr/local/bin/lsusb: line 89: 16#00 01: syntax error in expression (error token is "01"): This points to a scripting or formatting issue in thelsusbutility. The command failed while parsing USB device details, possibly due to an unexpected character or input format.
- Potential Issues:
- The script might be incompatible with the current environment or the USB descriptors contain unexpected data.
- The T1 controller is part of Apple’s Secure Enclave. It might require special handling or drivers not present in your setup.
Suggestions for Resolution:
- Reconnect the device to different ports and check if the issue persists.
For macOS Errors (SPUSBDevice):
- Ensure all macOS updates are installed.
- If you’re using third-party USB devices, check if they require additional drivers.
- Restart your Mac and retry.
For lsusb Errors:
Ensure that lsusb is correctly installed. Reinstall it using a package manager like Homebrew (brew install lsusb).
brew install lsusbCheck the script at /usr/local/bin/lsusb for issues on or around line 89.
Run lsusb -v to get more verbose details about where it might fail.
For Device Recognition:
Use dmesg | grep USB to view kernel logs related to USB devices (Linux).
In my case, I reinstalled usbutils by executing the following commands:
brew reinstall usbutils

# If this causes problems,  do this first then run reinstall usbutils again
brew unlink lsusb
Conclusion
USB Relay Modules are powerful tools for building efficient and reliable automation systems. With FOSS tools like Python, you can create scalable and cost-effective solutions while maintaining the freedom to customize your setup. By understanding the relay wiring and serial command logic, you can confidently control up to 8 channels for diverse applications such as home automation, lab testing, and IoT integration.
Adopting open-source tools ensures not only adaptability but also the opportunity to contribute to a larger community of innovators. This guide provides a strong foundation for your automation projects, and we encourage you to experiment further.
Leave a Reply