

What if designing LED Matrix Icons felt more like doodling than coding?
I still remember the first time I tried to make LED Matrix Icons for a community project—what should’ve been a fun way to display simple graphics on an ESP32 felt more like deciphering ancient bitmap hieroglyphics. The tools were clunky, the tutorials skipped crucial steps, and the output looked more “chaotic glitch art” than “readable icon.”
But here’s the thing: in the world of FOSS and low-cost microcontrollers, accessibility matters just as much as functionality. That’s why I set out to simplify this process—not just for myself, but for any educator, maker, or grassroots dev who wants their LED matrix to display something intentional without days of trial and error.
In this guide, you’ll learn how to design LED Matrix Icons the easy way using ESP32 and MicroPython, with free, open tools and zero proprietary nonsense.
👉 Ready to go from blinking blobs to pixel-perfect icons? Let’s get into it.

Getting Started with Your LED Matrix Setup
To begin, you’ll need an ESP32 microcontroller, a MAX7219-based 8×8 LED matrix, and basic accessories like jumper wires and a breadboard. First, ensure your ESP32 is running MicroPython. If you’re unsure how to do this, check our guide on installing MicroPython on ESP32.
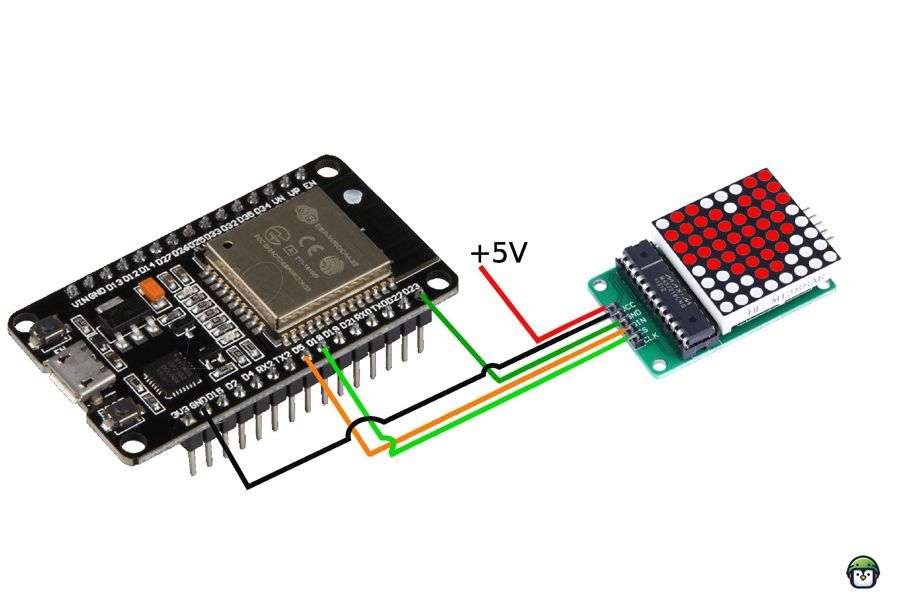
Next, download the MicroPython MAX7219 library by Mike Causer from GitHub. This library simplifies the control of individual LEDs and provides powerful tools for rendering graphics. Connect your LED matrix to the ESP32, ensuring proper power (3.3V or 5V) and ground (GND) connections. Miswiring can damage your components, so double-check the wiring diagram provided in the library documentation.
· · ─ ·𖥸· ─ · ·
Creating Basic LED Matrix Icons
Once your setup is complete, it’s time to light up your first LED Matrix Icons. Start with simple designs like a smiley face or a heart. Define the pixels to be lit using Python’s list structure. For instance, you can represent each row of an 8×8 matrix with an 8-bit binary number, where ‘1’ indicates a lit LED.
Here’s a quick example of drawing a smiley face:
from max7219 import Matrix8x8
from machine import Pin, SPI

spi = SPI(1, baudrate=10000000, polarity=0, phase=0, sck=Pin(18), mosi=Pin(23))
display = Matrix8x8(spi, Pin(5), 1)

display.fill(0)  # Clear the display
display.pixel(1, 1, 1)  # Define pixels for your icon
display.pixel(6, 1, 1)
display.pixel(3, 4, 1)
display.pixel(4, 4, 1)

display.show()
For more examples, visit our project hub on custom LED graphics.
· · ─ ·𖥸· ─ · ·
Display Pattern Function Using String Literals
Using string literals for the binary patterns directly is a valid and more intuitive approach. It would eliminate the need for conversions and make the code easier to understand because the data is already in a human-readable form (as binary strings) instead of needing bitwise manipulations.
However, there’s one important caveat: In Python, numeric values like 00011000 are interpreted as integers, not binary strings. You would need to keep the numbers in the binary format (either as strings or as 0b literals) for them to represent binary data directly.
def display_pattern(display, pattern):
   for row_index, row_value in enumerate(pattern):
        for col_index, pixel in enumerate(row_value):
            if pixel == '1':  # If the pixel is on (1)
                display.pixel(col_index, row_index, 1)  # Turn on the pixel
    display.show()  # Update the display to reflect changes


pattern = [
    "00011000",  #    **
    "00111100",  #   ****
    "01111110",  #  ******
    "11111111",  # ********
    "11111111",  # ********
    "01111110",  #  ******
    "00111100",  #   ****
    "00011000",  #    **
]

display_pattern(display, pattern):
Like what you’re reading?
Help keep DevDigest
free and caffeine-powered
—buy me a coffee on Ko-fi.
Common LED Matrix Icons

Creating common icons is a great way to get familiar with LED matrix design. Here are a few examples:
heart = [
    "01100110",
    "10011001",
    "10000001",
    "10000001",
    "01000010",
    "00100100",
    "00011000",
    "00000000",
]
display_pattern(display, heart)
Feel free to experiment with different patterns and create your own unique designs. For a more comprehensive list of predefined icons, visit our icon library.
Arrow Icon
arrow = [
    "00011000",
    "00011000",
    "00011000",
    "11111111",
    "01111110",
    "00111100",
    "00011000",
    "00000000",
]
display_pattern(display, arrow)
Smiley Icon
smiley = [
    "00111100",
    "01000010",
    "10100101",
    "10000001",
    "10100101",
    "10011001",
    "01000010",
    "00111100",
]
display_pattern(display, smiley)
· · ─ ·𖥸· ─ · ·
Make Your Pixels Count: Why It’s More Than Just Blinking Lights
Designing LED Matrix Icons might seem like a small thing—just a handful of dots lighting up in sequence. But if you’re part of the FOSS world, you know how even the smallest outputs can carry meaning, signal intent, or delight someone walking past your hacked-together digital signboard.
We’ve covered the easiest, most accessible path to building custom icons on your ESP32—whether for classroom demos, activism tech, art installations, or just impressing your inner child.
If this helped you reclaim your pixels, share it with someone else who might be stuck in the blinking void.
👉 Subscribe to DevDigest for more practical, open-source walkthroughs like this—built for makers, not gatekeepers.
Like what you’re reading?
Help keep DevDigest
free and caffeine-powered
—buy me a coffee on Ko-fi.
Leave a Reply