

You don’t need C++ to make an LED matrix dance. Just Micropython MAX7219.
A few weeks ago, I watched my kids fumble with a basic worksheet on shapes. Triangles became squares. Circles became… potatoes. Flashcards weren’t cutting it.
So I did what any slightly obsessed open source dad would do: I built them a game.
Armed with an ESP32, a MAX7219 LED matrix, and a little Micropython magic, I created a DIY display that could scroll shapes, symbols, and even smiley faces.
No fancy UI. No overpriced edtech toy. Just raw, low-level fun—and a chance for my kids to learn shapes the hacker way.
This article walks you through how I built a Micropython MAX7219 LED display in under 10 minutes, using entirely FOSS tools. Whether you’re an educator, hobbyist, or just looking to get more out of your ESP board, you’ll want to keep reading.
🔧 Let’s build something your kids—or your inner child—will love.
Repository Link: MAX7219 MicroPython Driver
- Author: Mike Causer
- License: MIT License
- Copyright: (c) 2017 Mike Causer

Motivation for This Documentation
While the MAX7219 library is functional and dependable, its existing documentation leaves much to be desired. Beginners and even experienced developers often find the provided instructions inadequate due to:
- Lack of Clarity: The documentation is not descriptive enough for first-time users.
- Insufficient Examples: Few examples are provided, leaving users guessing how to implement advanced features.
- Beginners Unfriendly: Concepts like SPI wiring, cascading displays, and brightness control are not explained in detail.
- Debugging Challenges: Troubleshooting erratic behavior due to wiring or grounding issues is not covered.
This comprehensive guide aims to address these shortcomings by providing detailed explanations, examples, and troubleshooting tips.
· · ─ ·𖥸· ─ · ·
Features of the MAX7219 LED Matrix Driver
- Support for Cascading: Control multiple 8×8 LED matrices (daisy-chained) with a single SPI connection.
- FrameBuffer Integration: Utilize MicroPython’s
framebuflibrary for drawing graphics, text, and animations. - Customizable Brightness: Adjust the intensity of LEDs.
- Efficient Communication: Optimized for high-speed SPI communication.
- Minimal Resource Usage: Lightweight driver ideal for microcontrollers like the ESP32, ESP8266, and Raspberry Pi Pico.
· · ─ ·𖥸· ─ · ·
Getting Started: Installing Micropython and Setting Up MAX7219
Before your LED matrix can light up with scrolling shapes and animated pixels, you’ll need to get the right firmware and libraries in place. Setting up Micropython MAX7219 on an ESP32 (or ESP8266) is surprisingly lightweight—especially if you’re used to bulky IDEs and bloated drivers.
This section walks you through the essentials: flashing your board with Micropython, installing the required max7219 module, and wiring up the matrix display. Whether you’re coming from Arduino or diving straight into Python-on-the-metal, the steps below will have you up and glowing in no time.
🔌 Let’s prep your board for its first light show.
Components Required
To get started, you’ll need:
- ESP32 (or other MicroPython-supported MCU)
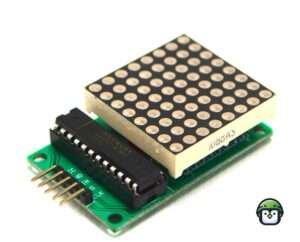
- 8×8 LED Matrix with MAX7219 driver
- 5V Power Supply
- Breadboard
- Wires
Wiring Diagram
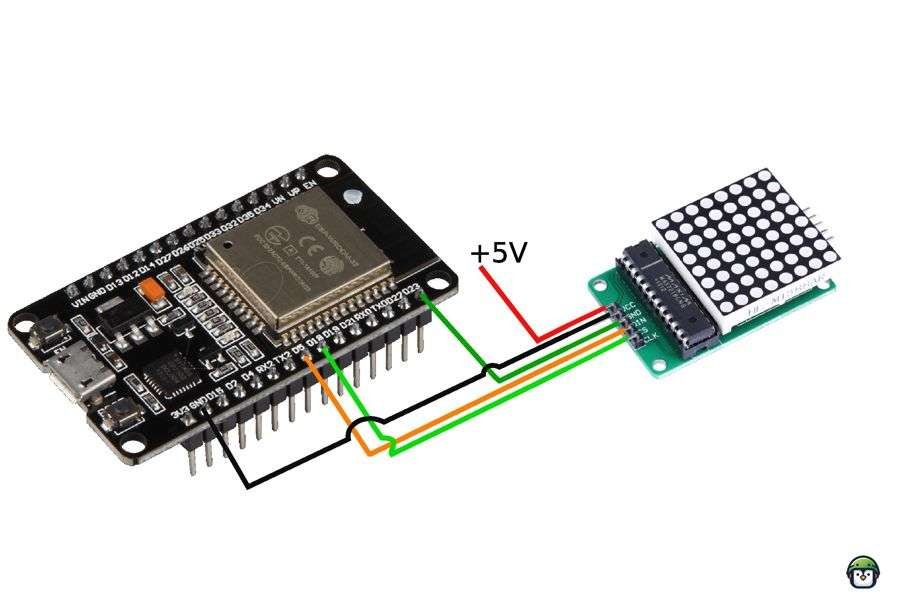
Connections
| MAX7219 Pin | ESP32 GPIO (Default) | Description |
|---|---|---|
| GND | GND | Ground |
| VCC | 5V | Power Supply |
| DIN | GPIO 23 | SPI MOSI (Data Input) |
| CS | GPIO 5 | SPI SS (Chip Select) |
| CLK | GPIO 18 | SPI SCK (Clock) |
Notes:
- Common Ground: Ensure the power supply ground (GND) is connected to the ESP32’s GND for stable operation.
- External Power Source: Use a 5V power supply to avoid overloading the ESP32 when driving multiple matrices.
Clone the MAX7219 repository:
git clone https://github.com/mcauser/micropython-max7219.gitCopy the max7219.py file to your MicroPython device’s file system using tools like ampy or Thonny.
· · ─ ·𖥸· ─ · ·
Basic Usage
Initialize the Driver
from machine import Pin, SPI
import max7219

# Initialize SPI and MAX7219
spi = SPI(2, baudrate=10000000, polarity=1, phase=0, sck=Pin(18), mosi=Pin(23))
cs = Pin(5, Pin.OUT)

# Create a display instance
matrix = max7219.Matrix8x8(spi, cs, 1)  # One 8x8 matrix
Display Text
matrix.fill(0)  # Clear the display
matrix.text('Hi!', 0, 0, 1)  # Display "Hi!"
matrix.show()  # Render the text
Parameters:
- Text
x,y: Starting point (top-left corner).1: Color of the line (1 for ON, 0 for OFF).
Draw a Pixel
matrix.pixel(3, 3, 1)  # Turn on the pixel at (3, 3)
matrix.show()
Parameters:
x,y: Starting point (top-left corner).1: Color of the line (1 for ON, 0 for OFF).
Draw a Line
matrix.line(0, 0, 7, 7, 1)  # Diagonal line from top-left to bottom-right
matrix.show()
Parameters:
x,y: Starting point (top-left corner).x1,y2: Ending point (bottom-right corner).1: Color of the line (1 for ON, 0 for OFF).
Adjust Brightness
matrix.brightness(5) # Set brightness level (0-15)· · ─ ·𖥸· ─ · ·
Advanced Usage
Cascading Multiple Matrices
- Connect multiple 8×8 matrices in series.
- Update the
Matrix8x8initialization to reflect the number of matrices:
matrix = max7219.Matrix8x8(spi, cs, 4) # Four cascaded matricesScrolling Text
text = "Hello, World!"
for i in range(len(text) * 8):
    matrix.fill(0)
    matrix.text(text, -i, 0, 1)  # Scroll text
    matrix.show()
    sleep(0.1)
Parameters:
- Text
x: decrementing (-1)y: Ending point (0).1: Color of the line (1 for ON, 0 for OFF).
Drawing Shapes
Horizontal Line
matrix.hline(0, 4, 8, 1)  # Horizontal line starting at (0,4) with length 8
matrix.show()
Parameters:
0, 4: Starting point (x=0, y=4).8: Length of the line.1: Color (1 for ON, 0 for OFF).
Vertical Line
matrix.vline(4, 0, 8, 1)  # Vertical line starting at (4,0) with height 8
matrix.show()
Paremeters:
4, 0: Starting point (x=4, y=0).8: Height of the line.1: Color (1 for ON, 0 for OFF).
Rectangle
matrix.rect(17, 1, 6, 6, 1)  # Draw a rectangle
matrix.show()
Explanation:
17, 1: Top-left corner of the rectangle.6, 6: Width and height.1: Color (1 for ON, 0 for OFF).
Filled Rectangle
matrix.fill_rect(25, 1, 6, 6, 1)  # Draw a filled rectangle
matrix.show()
· · ─ ·𖥸· ─ · ·
IconLibrary: A Collection of 8×8 LED Matrix Icons for ESP32
The IconLibrary provides a diverse set of binary icon patterns designed specifically for display on an 8×8 LED matrix using the ESP32 microcontroller. This library includes a variety of commonly used icons such as hearts, stars, arrows, and geometric shapes, each represented as an 8×8 grid of binary values. These patterns can be easily integrated into your projects for custom animations, display projects, or even interactive applications.
Each icon is encoded as a string array where each string represents a row in the 8×8 grid, with '1' representing an illuminated LED and '0' representing an unlit LED. The patterns are flexible and can be modified or expanded as needed to fit the requirements of your project.
The IconLibrary is intended for use with the micropython-max7219 driver, which allows you to interface with the MAX7219 chip to control 8×8 LED matrices efficiently. This integration enables you to easily display a wide range of icons on your LED matrix using the ESP32.
To get started with the IconLibrary, check out the full documentation where you’ll find installation instructions, detailed usage guides, and examples on how to display these icons on your LED matrix.
· · ─ ·𖥸· ─ · ·
Troubleshooting
Common Issues
- Erratic Behavior:
- Ensure a common ground between the ESP32 and the external power supply.
- Check for loose or incorrect connections.
- Dim or No LEDs Lit:
- Verify the 5V power supply is sufficient (at least 50mA per matrix).
- SPI Communication Errors:
- Use proper GPIO pins for SPI (refer to your board’s documentation).
· · ─ ·𖥸· ─ · ·
Tiny Chip, Big Impact
The Micropython MAX7219 might look like a simple driver for a humble LED matrix—but in the right hands, it becomes a canvas for creativity, learning, and problem-solving. In our case, it turned shape drills into playtime, and debugging into a family activity.
If this tutorial helped you make something useful, delightful, or weird—imagine what we could build next with the rest of the open source toolbox.
🔁 FOSS is more than code. It’s about sharing solutions that matter.
· · ─ ·𖥸· ─ · ·
Want more projects like this?
Subscribe to my newsletter for hands-on tutorials, practical guides, and open source hacks for people who like building things that work—especially when budgets don’t.
Let me know if you’d like a version of this tailored for Medium, LinkedIn, or Dev.to format!
Leave a Reply