

I thought my LED matrix animations were laggy—turns out it wasn’t the code, it was the timing.
Smooth Animations, Rough Start
When I first tried to get LED matrix animations working on an ESP32, I expected fireworks—literally. Instead, I got flickers, stutters, and something that looked more like a broken pager from the ’90s. I blamed the wiring, then the power supply, then the libraries. But after days of trial-and-error and scrolling through GitHub issues at 1AM, I finally realized: the problem wasn’t hardware. It was timing.
In this post, I’ll show you how to create buttery-smooth LED matrix animations using nothing but your ESP32 and well-tuned code—no expensive controllers, no bloaty libraries. As always, it’s about doing more with less—the open source way.
💡 Whether you’re building a wearable badge, a scrolling message display, or your own minimalist art installation, this is the FOSS-friendly blueprint I wish I had when I started.
Let’s dive in.
Table of Contents
Getting Started with LED Matrix Animations on ESP32
Before diving into the code, it’s important to understand what makes LED matrix animations tick—literally. At its core, an LED matrix is just a grid of lights waiting for instructions, and the ESP32 is your conductor. But without proper timing and refresh logic, your “animation” will look more like a glitchy PowerPoint than pixel art. In this section, we’ll walk through wiring, matrix setup, and the core concepts that make smooth animations possible. Whether you’re using MicroPython or Arduino, this is the part that lays the groundwork for everything else.
Setting Up Your LED Matrix with ESP32
To get started, you’ll need:
- An ESP32 microcontroller.
- A cascaded 8×8 LED matrix compatible with the MAX7219 driver.
- Connecting wires and a breadboard for prototyping.
- A power source (e.g., USB).
Wiring Instructions
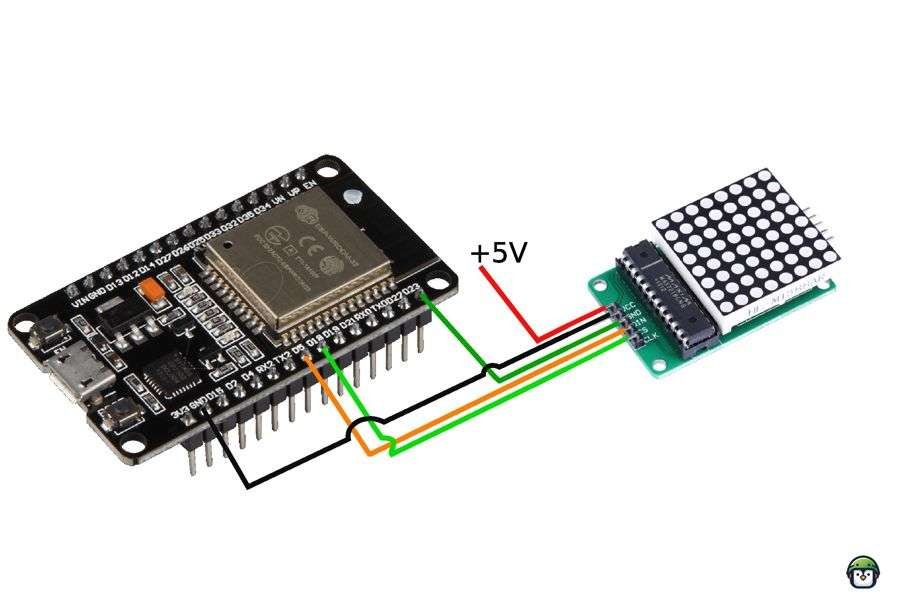
Ensure proper connections between the ESP32 and the LED matrix:
- VCC to 3.3V or 5V: Power the matrix.
- GND to GND: Establish a ground connection.
- DIN to GPIO 23: Data in.
- CS to GPIO 5: Chip select.
- CLK to GPIO 18: Clock signal.
Double-check your connections to prevent damage to your components. Incorrect wiring may lead to issues or even brick your ESP32.
Programming Animations with MicroPython
Using MicroPython simplifies coding for the ESP32. Install the MAX7219 driver library, such as the one by the author (https://github.com/srgalope/micropython-max7219v2024), to control your LED matrix.
Example Code: Scrolling Text
from machine import Pin, SPI
from max7219v2024 import Matrix8x8
import time

# Initialize SPI and LED matrix
spi = SPI(1, baudrate=10000000, polarity=0, phase=0, sck=Pin(18), mosi=Pin(23))
cs = Pin(5, Pin.OUT)
display = Matrix8x8(spi, cs, 4)  # 4 cascaded matrices
display.brightness(5)

def scroll_text(text):
    for i in range(len(text) * 8):
        display.fill(0)
        display.text(text, -i + 32, 0, 1)
        display.show()
        time.sleep(0.1)

scroll_text("Hello World!")
Advanced Animations
Custom Icons and Patterns
You can design custom icons by defining binary patterns for the LED matrix. For example, a simple heart pattern:
HEART = [
    "01100110",
    "11111111",
    "11111111",
    "11111111",
    "01111110",
    "00111100",
    "00011000",
    "00000000",
]

HEART_HOLLOW = [
    "01100110",
    "10011001",
    "10000001",
    "10000001",
    "01000010",
    "00100100",
    "00011000",
    "00000000",
]

HEART_MD_HOLLOW = [
    "00000000",
    "01100110",
    "01011010",
    "01000010",
    "00100100",
    "00011000",
    "00000000",
    "00000000",
]

HEART_SM_HOLLOW = [
    "00000000",
    "00000000",
    "00111100",
    "00111100",
    "00011000",
    "00000000",
    "00000000",
    "00000000",
]
Animating Patterns
Use a sequence of binary patterns to create animations such as a bouncing ball or a waving flag. Define patterns in a list and iterate through them in an unconditional loop with a timed sequence.
from max7219v2024 import Matrix8x8
from machine import Pin, SPI
from  time import sleep_ms
import IconsLibrary

spi = SPI(1, baudrate=10000000, polarity=0, phase=0, sck=Pin(18), mosi=Pin(23))
matrix = Matrix8x8(spi, Pin(5), 1)

matrix.fill(0)  # Clear the display
matrix.brightness(0)

def display_pattern(display, pattern):
    for row_index, row_value in enumerate(pattern):
        for col_index, pixel in enumerate(row_value):
            if pixel == '1':  # If the pixel is on (1)
                display.pixel(col_index, row_index, 1)  # Turn on the pixel
    display.show()  # Update the display to reflect changes


ICONS = [
        IconsLibrary.HEART_SM_HOLLOW,
        IconsLibrary.HEART_MD_HOLLOW,
        IconsLibrary.HEART_HOLLOW,
        ]

pattern_length = len(ICONS)
while True:
    for i,pattern in enumerate(ICONS):
        display_pattern(matrix,pattern)
        matrix.fill(0)
        sleep_ms(100)
· · ─ ·𖥸· ─ · ·
Conclusion: Make It Smooth, Make It Yours
If there’s one thing this journey taught me, it’s that great LED matrix animations don’t require powerful chips or proprietary code—they just need intentionality. With an ESP32, a little timing finesse, and the open tools we have at our disposal, you can create motion that feels alive.
Whether you’re lighting up a makerspace wall or building a low-cost interactive project for a classroom, the skills you’ve picked up here are fully reusable—and totally hackable.
Want More DIY ESP32 Goodness?
Join the DevDigest Newsletter to get bite-sized tutorials, code snippets, and FOSS-friendly projects delivered straight to your inbox. No fluff. No gatekeeping. Just real builds, real tools, real freedom.
💬 Got a matrix you’re proud of? Tag me. I’d love to feature it.
Like what you’re reading?
Help keep DevDigest
free and caffeine-powered
—buy me a coffee on Ko-fi.
Leave a Reply