

If you’ve been wiring the MP3 TF-16P pinout like the datasheet says, this might explain the weird glitches.
The MP3 TF-16P module ESP32 combination is a powerful way to bring audio playback to your embedded projects. This module provides a straightforward solution for integrating sound effects, music, and other audio functionalities into your ESP32 applications. By following the steps in this guide, you will learn how to wire, power, and program the MP3 TF-16P module ESP32 setup using MicroPython.
Whether you’re building an interactive toy, a voice-guided system, or a fun sound effects machine, the MP3 TF-16P module ESP32 setup offers flexibility and ease of use. In this article, we will discuss wiring diagrams, best practices for powering the module, and a sample script to get you started. With proper file organization and stable connections, your audio-enabled projects will perform seamlessly.
Check the Datasheet here.

What is the MP3-TF-16P Module?
The MP3-TF-16P is a small audio playback module that reads MP3 files directly from a microSD card. It communicates over UART and can play sounds by receiving simple serial commands. It supports both direct speaker output and DAC out for amplifiers. It’s ideal for projects that need sound but don’t require complex audio processing.
Materials Needed
- ESP32 development board
- MP3 TF-16P module
- MicroSD card (formatted to FAT32) with folders like
000,001, etc. - Speaker or headphones
- Level shifter module or amplifier (optional for higher volume)
- Jumper wires
- Breadboard
Why each component?
- ESP32: the brain of the operation.
- MP3-TF-16P: plays audio files on command.
- MicroSD card: holds your .mp3 files.
- Speaker: lets you hear the sound.
- Jumper wires: connect everything together.
MP3-TF-16P Pinout and Connections
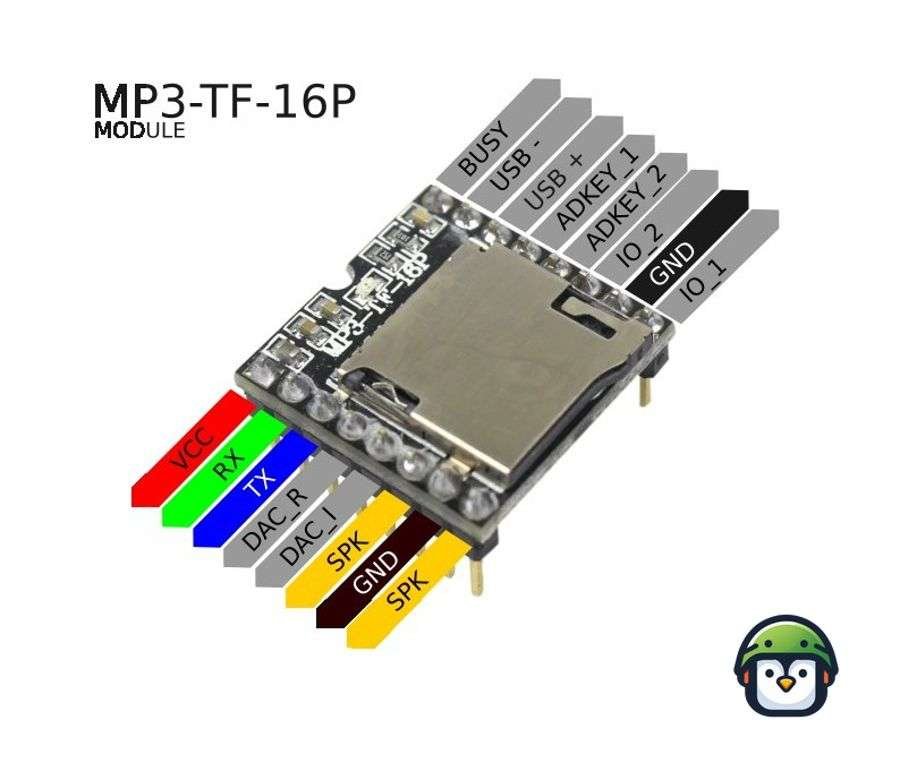
| MP3-TF-16P Pin | Description | Connects To (ESP32) |
|---|---|---|
| VCC | Power input (use 5V) | 5V |
| GND | Ground | GND |
| TXD | Serial out (optional for debug) | RX (e.g. GPIO16) |
| RXD | Serial in (for commands) | TX (e.g. GPIO17) |
| SPK1/SPK2 | Speaker output | Speaker terminals |
Note: You must use 5V for VCC. Using 3.3V may cause playback issues.
Prepping the MicroSD Card
- Format the card as FAT32.
- Place your
.mp3files in the/mp3folder. - File names should follow the format
0001.mp3,0002.mp3, etc.
The module won’t recognize files that
Wiring Diagram
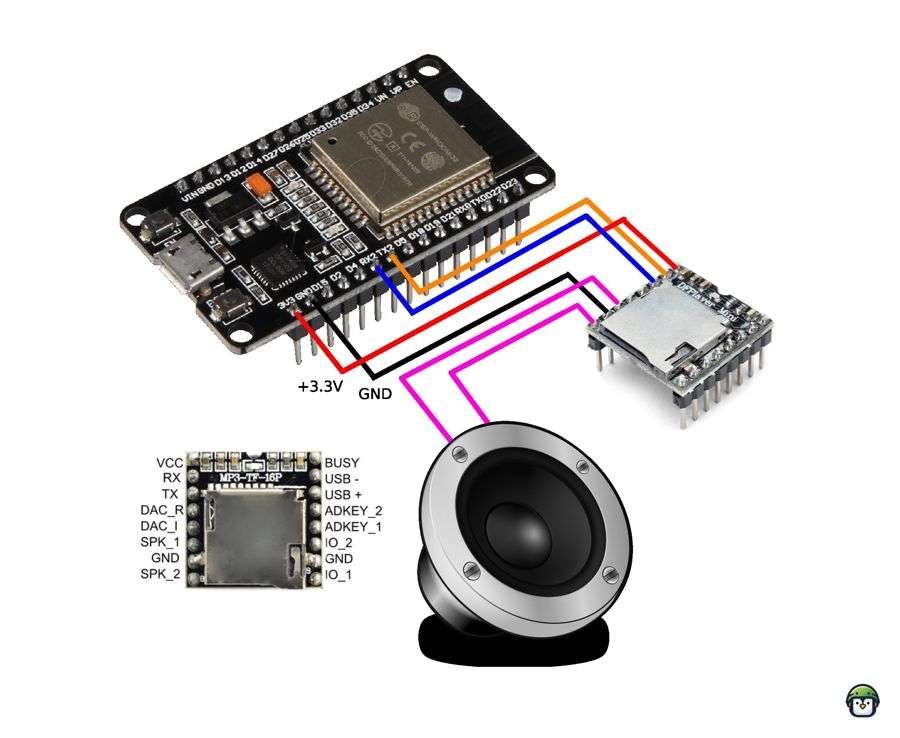
| MP3 TF-16P Pin | ESP32 Pin | Notes |
|---|---|---|
| VCC | 5V | Recommended for stable operation; 3.3V may cause choppiness |
| GND | GND | Common ground is essential |
| RXD | GPIO17 (TX) | Serial communication |
| TXD | GPIO16 (RX) | Serial communication |
| SPK_1, SPK_2 | Speaker | Use an amplifier for higher volume |
For more information on ESP32 pin configurations, refer to this comprehensive ESP32 pinout guide.
Powering Notes
- Use 5V for reliable performance. Operating at 3.3V can result in choppy audio playback.
- For louder volume settings, integrate an amplifier circuit or level shifter module to ensure consistent output.
File Organization
To ensure the module can read files correctly:
- Organize files into numbered folders like
000,001,002, etc. - Inside each folder, name files sequentially as
001.mp3,002.mp3, etc.
· · ─ ·𖥸· ─ · ·
MicroPython Example Code
Below is an example script to control the MP3 TF-16P module ESP32 setup using MicroPython:
from machine import UART, Pin
import time

# Initialize UART2 (TX2 and RX2 on ESP32)
uart = UART(2, baudrate=9600, tx=17, rx=16)  # TX2=GPIO17, RX2=GPIO16

def send_command(command, param=0):
    """
    Sends a command to the MP3-TF-16P module.
    :param command: The command byte.
    :param param: The parameter for the command (16-bit value).
    """
    packet = bytearray([
        0x7E,       # Start byte
        0xFF,       # Version
        0x06,       # Length
        command,    # Command
        0x00,       # Feedback (0x00 = no feedback)
        (param >> 8) & 0xFF,  # Parameter high byte
        param & 0xFF,         # Parameter low byte
        0xEF        # End byte
    ])
    uart.write(packet)

def play_track(track_number):
    """
    Plays a specific track from the SD card.
    :param track_number: The track number to play (1-based index).
    """
    print(f"Playing track: {track_number}")
    send_command(0x03, track_number)

def set_volume(volume):
    """
    Sets the playback volume.
    :param volume: Volume level (0-30).
    """
    if 0 <= volume <= 30:
        print(f"Setting volume to: {volume}")
        send_command(0x06, volume)
    else:
        print("Volume out of range (0-30)")

def stop_playback():
    """
    Stops playback.
    """
    print("Stopping playback")
    send_command(0x16)

# Example usage
def main():
    print("Initializing MP3-TF-16P module")
    time.sleep(1)  # Allow time for the module to initialize

    set_volume(20)  # Set volume to a moderate level
    time.sleep(1)

    play_track(1)  # Play the first track
    time.sleep(5)  # Wait for 5 seconds
    stop_playback()  # Stop playback

# Run the example
main()
How the Code Works
- The
UARTobject sets up communication between the ESP32 and MP3 module. - Commands follow a specific byte format understood by the module.
- The
play_track()function constructs the right byte string and sends it over serial.
Common Pitfalls and Troubleshooting
- No sound? Ensure the SD card is FAT32, named correctly, and powered with 5V.
- Static or distortion? Try using a capacitor between VCC and GND or use an external amp.
- No response? Double-check your TX/RX pin wiring. Try swapping them if needed.
Real-World Use Cases
- Talking Alarm Clock: Set up the ESP32 to play time-based alerts.
- Sensor Alerts: Combine with PIR or gas sensors to play warnings.
- Interactive Toys: Add voice feedback to your robotic projects.
What’s Next?
You can go further by:
- Adding buttons to control volume and playback
- Playing random tracks for dynamic interaction
- Combining with a web dashboard or app via Wi-Fi
· · ─ ·𖥸· ─ · ·
Troubleshooting Tips
- Ensure proper UART connections.
- Check file naming and folder structure on the microSD card.
- Operate at 5V for smooth playback.
· · ─ ·𖥸· ─ · ·
Wrapping It Up: Speak Up with MicroPython
You’ve just unlocked audio feedback for your ESP32 projects—no bulky MP3 players or complex libraries needed. The MP3-TF-16P brings sound to your projects simply, and now you know how to get it talking. Have fun experimenting with different triggers and sound combinations, and don’t forget to share your creations.
Want more ESP32 and MicroPython guides? Sign up for my newsletter and get hands-on walkthroughs straight to your inbox.
For more details on enhancing your ESP32 projects, check out our in-depth tutorials.
Leave a Reply