

My Hall Effect Sensor kept misfiring—turns out orientation matters more than I thought.
Misaligned Expectations (Literally)
The first time I hooked up a Hall Effect Sensor to my ESP32, I thought I nailed it—clean wiring, decent code, a nice neodymium magnet. But every time I tested it, the values were off or flat-out dead. I swapped sensors, changed pins, rewrote the loop… and still nothing. Turns out the magnet wasn’t the issue. I was just pointing it the wrong way.
It was a humbling reminder that precision doesn’t just live in code—it lives in orientation, placement, and understanding the subtle physics behind your components. And like most things in the FOSS world, no one hands you the “gotchas”—you find them the hard way, and you document them so the next person doesn’t have to.
In this post, I’ll walk you through how to set up and use a Hall Effect Sensor with ESP32 properly, troubleshoot common misfires, and explore use cases that go beyond door triggers—no paid library or cloud lock-in required.
Let’s align our sensors—and our expectations.

How Hall Effect Sensor for ESP32 Works
The Hall effect sensor operates based on the Hall effect principle, where a voltage difference is produced across an electrical conductor when it is exposed to a magnetic field. This voltage is proportional to the strength of the magnetic field, enabling precise measurements. Hall effect sensors are commonly used in applications like current sensing, position detection, and speed monitoring. By pairing Hall effect sensor for ESP32, you gain the ability to process this data for a wide range of custom applications.
Related:
Materials Needed
To follow along, you will need:
- An ESP32 development board
- A Hall effect sensor (e.g., A3144 or similar)
- Jumper wires
- A breadboard
- A power source (USB cable or battery pack)
Wiring Hall Effect Sensor for ESP32
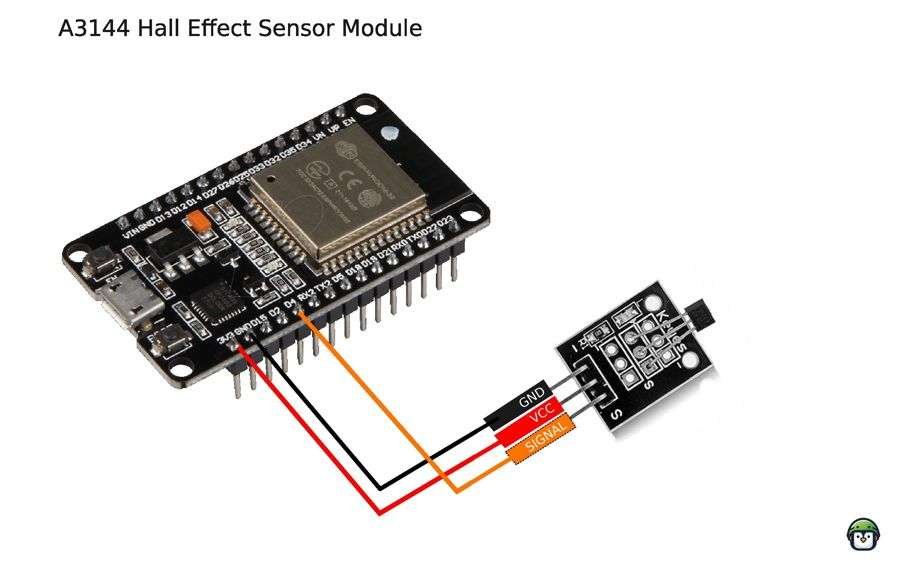
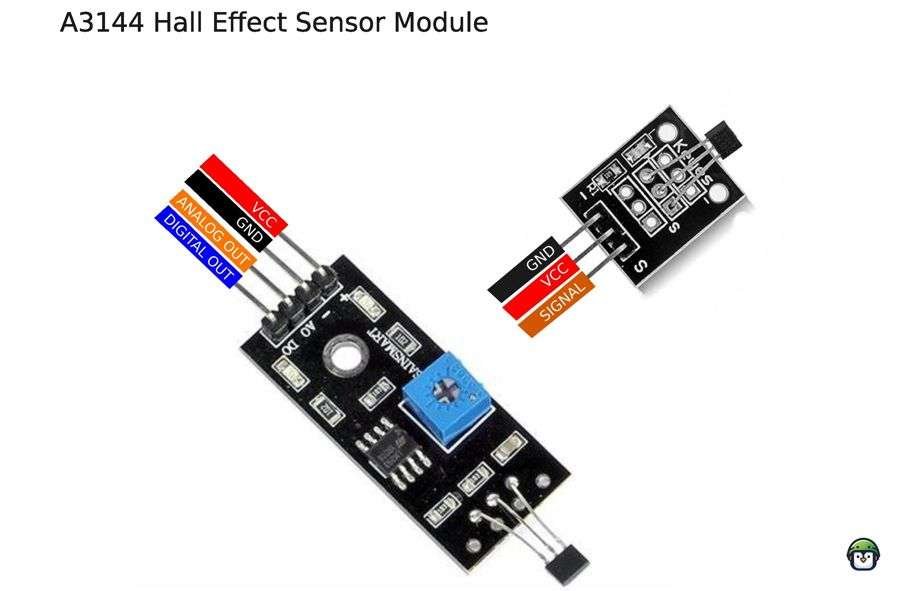
The typical Hall effect sensor has three pins: VCC (power), GND (ground), and OUT (signal output). Here’s how to connect Hall effect sensor for ESP32:
- Connect the VCC pin of the Hall effect sensor to the 3.3V pin of the ESP32.
- Connect the GND pin of the sensor to a GND pin on the ESP32.
- Connect the OUT pin of the sensor to one of the ESP32’s GPIO pins (e.g., GPIO 4).
Ensure the connections are secure, as loose connections may cause inconsistent readings.
· · ─ ·𖥸· ─ · ·
Coding ESP32 for Magnetic Field Detection with Hall Effect Sensor
Below is an example of a MicroPython script to read data from Hall effect sensor for ESP32:
from machine import Pin, ADC
import time

# Initialize the Hall effect sensor
hall_sensor = ADC(Pin(34))  # Replace 34 with your GPIO pin
hall_sensor.atten(ADC.ATTN_11DB)  # Set the range to 0-3.3V

while True:
    magnetic_field = hall_sensor.read()  # Read sensor value
    print("Magnetic field strength:", magnetic_field)
    time.sleep(0.5)  # Delay for readability
· · ─ ·𖥸· ─ · ·
Applications of Hall Effect Sensor for ESP32 Projects
- Magnetic Switches: Use Hall effect sensor for ESP32 to detect the opening or closing of doors and windows by sensing the proximity of a magnet.
- Motor Position Monitoring: Measure the position of a motor shaft by detecting the magnetic field generated by magnets on the shaft.
- Compass Systems: Combine magnetic field readings from Hall effect sensor for ESP32 setup with an algorithm to determine direction in navigation systems.
- Current Sensing: Measure electrical current in wires by detecting the magnetic field produced by the current flow.
· · ─ ·𖥸· ─ · ·
Conclusion: Align the Field, Empower the Project
Why the Hall Effect Sensor Is More Than Just a Switch
Measuring magnetic fields may sound like a niche application, but once you understand how a Hall Effect Sensor works with the ESP32, it becomes a versatile, elegant solution for real-world interaction—quiet, solid-state, and dead simple when wired right. From RPM counters to contactless switches, the Hall Effect Sensor earns its place in your FOSS toolkit by being both affordable and reliable.
The key lesson? Your sensor is only as smart as its setup. And orientation isn’t just physical—it’s philosophical. In open hardware, we learn, correct, and share.
If this guide helped you avoid the same head-scratching I went through, I share more FOSS-grounded insights like this weekly—focused on practical builds, clean code, and sensors that just work.
👉 Subscribe here for more real-world ESP32 experiments, motion hacks, and FOSS-powered electronics:
https://www.samgalope.dev/newsletter/
Because in open-source, every misfire is just a tutorial in disguise.
Like what you’re reading?
Help keep DevDigest
free and caffeine-powered
—buy me a coffee on Ko-fi.
Leave a Reply