

Everyone says the tilt sensor is basic—until your ESP32 starts reacting like a cat on caffeine.
A few months back, I was helping a local youth robotics team debug a motion-triggered alarm system built with spare parts. One sensor was acting up—it would randomly trigger even when still. The culprit? A poorly wired tilt sensor taped to a shoebox lid. Classic.
That tiny moment reminded me just how powerful—and underestimated—the humble tilt sensor really is, especially when paired with something as flexible as the ESP32. These cheap components aren’t just beginner-friendly—they’re a gateway to real-world motion detection, automation, and responsive systems.
In the FOSS world, we’re all about building smarter, leaner, cheaper tech that works for real people. So whether you’re building a DIY security system, a tamper trigger, or a budget motion-activated art project, learning how to wire up and code a tilt sensor with ESP32 is a small win that can unlock big possibilities.
Let me show you how to do it right—clean, fast, and the open-source way.
Read on for the full guide.

Understanding a Tilt Sensor
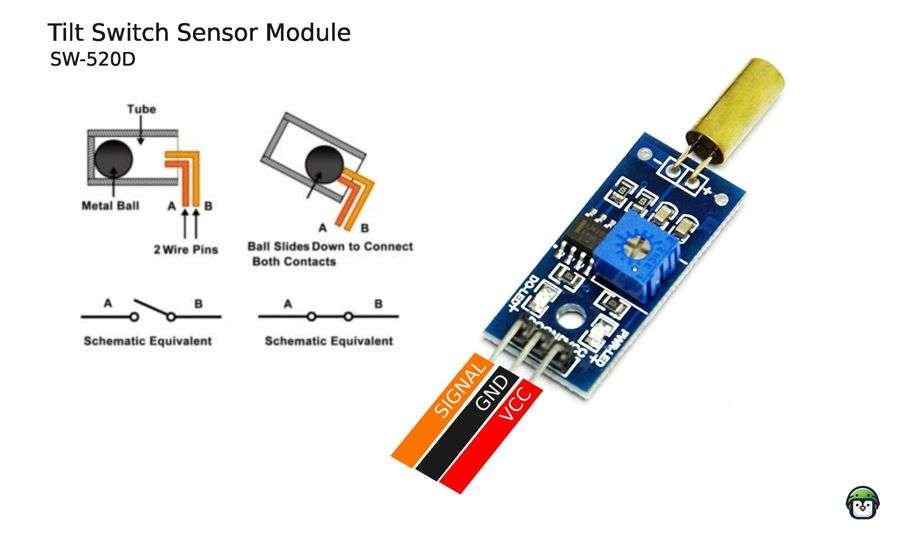
Tilt sensors are designed to detect angular changes relative to gravity. They typically contain a conductive material or mechanism, such as a ball bearing or liquid, that shifts position when tilted. This movement changes the sensor’s electrical state, allowing the detection of orientation changes.
Key Features:
- Compact Size: Easily fits into various projects.
- Simple Operation: Outputs high or low signals based on tilt.
- Low Power Consumption: Ideal for battery-operated systems.
Tilt sensors are commonly used in applications like gaming controllers, safety alarms, and robotic systems to monitor orientation or detect unusual movements.
Related:
Required Components
To integrate a tilt sensor with the ESP32, you’ll need the following:
- An ESP32 microcontroller
- A tilt sensor (e.g., SW-520D)
- Resistors (10kΩ for pull-down or pull-up configuration)
- Jumper wires
- Breadboard
- A 5V power supply (if needed for the tilt sensor)
Circuit Diagram and Wiring
Below is the wiring setup to connect the tilt sensor with the ESP32:
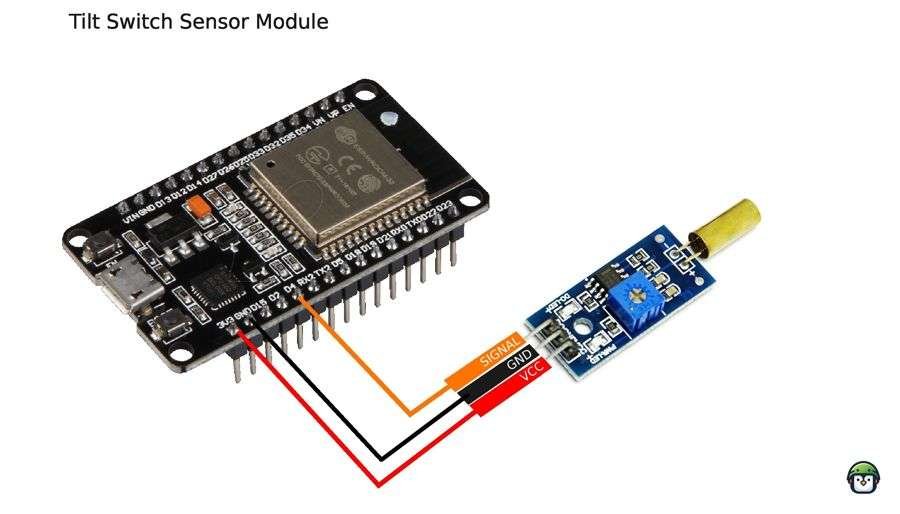
- Connect the sensor’s signal pin to GPIO 4 on the ESP32.
- Connect the sensor’s ground pin (GND) to the ESP32 GND.
- Attach the sensor’s VCC pin to the ESP32’s 3.3V pin.
Here’s how the wiring looks:
- Tilt Sensor Signal Pin → ESP32 GPIO 4
- Tilt Sensor VCC Pin → ESP32 3.3V
- Tilt Sensor GND Pin → ESP32 GND
· · ─ ·𖥸· ─ · ·
Programming the ESP32
Using MicroPython, you can easily read data from the tilt sensor. Below is a simple script to detect tilt and display the sensor’s state:
from machine import Pin
import time

# Initialize the tilt sensor on GPIO 18
tilt_sensor = Pin(18, Pin.IN)

def check_tilt():
    if tilt_sensor.value() == 1:
        print("Tilt detected!")
    else:
        print("No tilt detected.")

while True:
    check_tilt()
    time.sleep(0.5)  # Check every 500ms
Code Explanation:
- Pin Initialization: The sensor is connected to GPIO 18 and configured as an input.
- State Reading: The script reads the sensor’s state and prints messages based on the tilt condition.
- Loop: The system continuously checks for tilt at regular intervals.
Testing the System
Once everything is set up:
- Upload the code to your ESP32 using a MicroPython IDE like Thonny.
- Tilt the sensor to observe the printed messages in the serial monitor.
- Adjust the sensitivity by experimenting with resistor values if needed.
· · ─ ·𖥸· ─ · ·
Real-World Applications
Integrating a tilt sensor with the ESP32 opens the door to numerous practical applications, such as:
- Tilt-Activated Alarms: Trigger alarms when a device is improperly positioned.
- Orientation Monitoring: Track the angle of devices in robotics and automation.
- Safety Systems: Detect falls or movements in wearable devices.
· · ─ ·𖥸· ─ · ·
Motion Sensing, the Open-Source Way
Integrating a tilt sensor with ESP32 might seem like a beginner’s task—but done well, it’s a stepping stone toward smarter, more responsive embedded systems. You’ve now seen how to wire it, debounce it, and code it cleanly using open-source tools and practices.
This kind of hands-on tinkering is what fuels accessible innovation—especially for under-resourced makers, student developers, and grassroots technologists. And that’s exactly what this blog stands for: practical, low-cost builds that solve real problems, the FOSS way.
Want more guides like this?
If you’re into low-budget builds, ethical hacking, or turning $2 sensors into full-on projects, you’ll love the stuff I send out.
Subscribe to my newsletter for fresh tutorials, toolkits, and behind-the-scenes insight—no fluff, just FOSS.
Like what you’re reading?
Help keep DevDigest
free and caffeine-powered
—buy me a coffee on Ko-fi.
Leave a Reply