

Turns out, reliable ESP32 button input is less about wiring—and more about what you do after the press.
There I was, crouched in the corner of a community center’s server room, testing a covert access device I’d prototyped the night before. Everything worked—except the trigger. I pressed the button. Nothing. Pressed again. Still nothing. Then suddenly, the ESP32 fired off three actions in a row like it was catching up on lost time. It wasn’t faulty hardware—it was noisy ESP32 button input and no debounce logic.
This wasn’t just frustrating. In any ethical hacking context—or even basic automation work—a poorly handled button input on ESP32 can mean the difference between stealth and chaos.
If you’re building discreet tools, custom dashboards, or reactive microcontroller workflows, clean and reliable button input isn’t optional—it’s foundational. In this guide, I’ll walk you through how to read ESP32 button input using MicroPython, handle bounce without losing your mind, and make your project actually respond when you expect it to.
Let’s dive in—because timing isn’t everything… it’s the only thing.

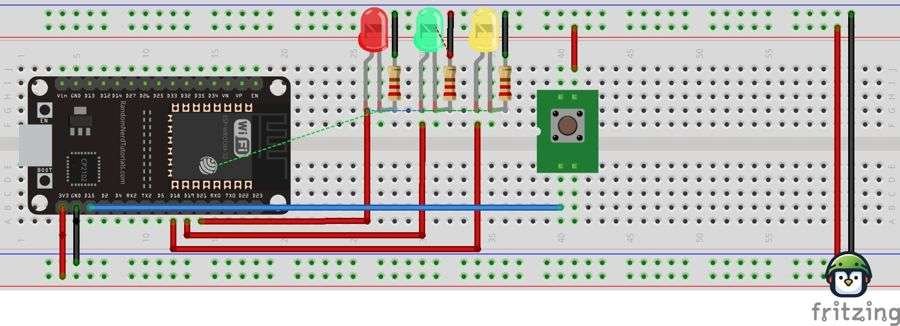
Wiring the Button and LED
To get started, wire the components as follows:
- Button: Connect one side of the button to pin 15 and the other side to GND.
- LED: Connect the anode (positive leg) of the LED to pin 21 and the cathode (negative leg) to GND.
You can use a 10kΩ pull-down resistor between pin 15 and GND to ensure that the input is in a known state when the button is not pressed.

· · ─ ·𖥸· ─ · ·
What Are Pull-Up and Pull-Down Resistors?
When working with buttons and switches, it’s essential to understand the concept of pull-up and pull-down resistors. These resistors are used to define the state of an input pin when it is not actively being driven by a signal, ensuring that the pin doesn’t float and give unpredictable results.
Pull-Down Resistor:
A pull-down resistor connects an input pin to ground (GND) when the button is not pressed. This ensures that the input pin reads as 0 (LOW) in the absence of an active signal. When the button is pressed, the pin is connected to the supply voltage (e.g., 3.3V), and the input reads 1 (HIGH).
Use Case: A pull-down resistor is used when you want the default state of the pin to be 0 (LOW).
Wiring: You connect one end of the button to the input pin and the other to GND. A pull-down resistor can be placed between the input pin and GND (although the ESP32 has internal pull-down resistors that can be activated in software, eliminating the need for an external resistor).
Pull-Up Resistor:
A pull-up resistor connects an input pin to the supply voltage (typically 3.3V or 5V). When the button is not pressed, the pin will read 1 (HIGH). When the button is pressed, the pin is connected to GND, and the input reads 0 (LOW).
Use Case: A pull-up resistor is used when you want the default state of the pin to be 1 (HIGH).
Wiring: You connect one end of the button to the input pin and the other to GND. A pull-up resistor can be placed between the input pin and the supply voltage, or you can enable the internal pull-up resistors in the ESP32, avoiding the need for an external resistor.
In our example, we’ll use the internal pull-down resistor on pin 15 of the ESP32, meaning that when the button is not pressed, the input pin will be pulled to GND (LOW), and when the button is pressed, it will read HIGH.
· · ─ ·𖥸· ─ · ·
Basic Button Input to Control LED
Now that the hardware is set up, let’s write a simple MicroPython script to read the button input and control the LED. The button will toggle the state of the LED each time it’s pressed.
from machine import Pin
from time import sleep

# PINS
button = Pin(15, Pin.IN, Pin.PULL_UP)  # Button connected to pin 15
led = Pin(21, Pin.OUT)  # LED connected to pin 21

# Initial LED state (off)
led.off()

while True:
    if button.value() == 0:  # Check if button is pressed
        led.value(not led.value())  # Toggle the LED state
        sleep(0.2)  # Debounce delay to avoid multiple toggles
Explanation of the Code
- Button Pin Setup:
- The button is connected to pin 15 and is configured as an input with an internal pull-down resistor (
Pin.PULL_DOWN). This ensures the button input reads as low (0) when not pressed.
- The button is connected to pin 15 and is configured as an input with an internal pull-down resistor (
- LED Pin Setup:
- The LED is connected to pin 21 and is set as an output pin (
Pin.OUT).
- The LED is connected to pin 21 and is set as an output pin (
- Button Press Detection:
- The
button.value()function reads the state of the button. When the button is pressed, it returns1. We check for this in theifstatement to detect the button press.
- The
- LED Toggling:
- The LED state is toggled using the
led.value(not led.value())statement. This flips the LED state between0(off) and1(on) each time the button is pressed.
- The LED state is toggled using the
- Debouncing:
- A short
sleep(0.2)delay is added to debounce the button, ensuring that the LED only toggles once per press, even if the button’s mechanical bounce causes multiple inputs.
- A short
· · ─ ·𖥸· ─ · ·
Expanding the Example: LED Blink on Button Press
For more advanced functionality, you can modify the script to blink the LED a set number of times when the button is pressed. Here’s an expanded version:
from machine import Pin
from time import sleep

# PINS
button = Pin(15, Pin.IN, Pin.PULL_DOWN)  # Button connected to pin 15
led = Pin(21, Pin.OUT)  # LED connected to pin 21

# Blink LED when button is pressed
def blink_led(times):
    for _ in range(times):
        led.on()
        sleep(0.5)
        led.off()
        sleep(0.5)

while True:
    if button.value() == 1:  # Button is pressed
        blink_led(3)  # Blink LED 3 times
        sleep(1)  # Wait before detecting another press
In this version, pressing the button will make the LED blink three times. This could be adapted for more complex actions like controlling multiple LEDs or triggering other devices.
· · ─ ·𖥸· ─ · ·
Conclusion: Reliable Input Starts with Reliable Thinking
👇 Debouncing Is More Than Code—It’s Mindset
When you’re working with physical input in a digital world, it’s easy to underestimate the chaos between press and signal. Whether you’re building tools for ethical reconnaissance or simply exploring MicroPython as a teaching platform, how you handle ESP32 button input reflects your mindset: noisy, reactive code—or clean, intentional design.
Here’s what we’ve covered:
- How button bounce messes with signal integrity
- The simplest ways to debounce in MicroPython
- Real-world strategies for improving timing and input accuracy
Clean code, clean signals.
👉 If you’re into low-cost tools, clever tech education, and FOSS-first hacking with purpose—subscribe to the DevDigest newsletter.
Get updates, tactical guides, and tools that punch way above their weight.
Like what you’re reading?
Help keep DevDigest
free and caffeine-powered
—buy me a coffee on Ko-fi.
Leave a Reply